How many other CH-R hybrid owners are suffering the same problem as I am with the 12v battery?
It is the most unreliable car I have ever bought and if left unused for more than one day the 12v battery fails and the car will not start.
The dealer has checked it several times and says that the battery is fine but the car should be used for long journeys every day.
What is the point of buying an ecological car that stands idle on the drive because it will not start.
Does anyone else think that Toyota have missold these cars and that the new technology does not match up to expectations.
Hello everyone,
After many have had the tiresome experience with the permanently discharged 12V battery and many things have been tried. The unbelievable stories (excuses) from Toyota became unbearable but the charging problems of the 12V battery were not solved, here is a guide on how I found and solved the cause.
I became suspicious after my AGM battery, which was replaced exactly three years ago, had to be topped up with the charger every 5 days because the state of charge constantly fluctuated somewhere between 60% and 20%, as it turned out it had less than 50% of the initial capacity of 52Ah and was curved at the walls, i.e. sulphation.
When the new battery was installed, I noticed that after driving off after about 500 metres it was no longer charged or at least insufficiently charged, but this changed depending on which driving mode was selected and also when I turned the handlebars full turn, for example, regardless of which side I was on, but still with what I understood to be too low a charge rate. Anyone who knows a bit about batteries and charging technology knows that a lead battery sulphates if it remains discharged for a long time or is insufficiently charged. Many chargers therefore start a charging cycle if the battery voltage drops too low, otherwise a maintenance cycle is started depending on the battery type (slight gassing).
Logging the voltages confirmed my suspicions and so I finally set about troubleshooting
There are actually two causes that really strain and ultimately destroy the 12V battery: excessive power consumption when the vehicle is stationary and insufficient charging while driving. In my C-HR, this meant that the charge level of the 12V battery only went downwards, no matter how much I drove. I don't yet know the cause of the excessive power consumption when stationary, but I will look into it at a later date; the problem of insufficient charging has been found and rectified.
The work can be carried out by anyone with a little manual dexterity in about 1 hour, but requires a minimum of materials:
(Fig.
01) multimeter, battery terminal grease in tube, battery terminal protection spray, methylated spirits or universal thinner, silver conductive lacquer (optional), sandpaper - brass brush or similar, painter's tape.
(Fig. 02) To enable the hard foam insert to be removed later, the rear seats must be turned over and the parcel shelf and floor cover removed.
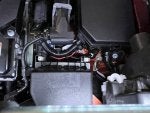
(Fig. 03) After the plastic battery cover is put aside, it looks like this...
(Fig. 04) As the use of chargers can never be ruled out, I made this small but useful modification to the positive terminal cover...
(picture 05) an M8 threaded sleeve is also needed...
(Fig. 06) If you only remove the red plastic part, it has an M8 screw connection underneath to which the positive outputs are attached. Now drill a hole in the red plastic right above it, through which the M8 threaded sleeve fits and can be attached to the screw underneath...
(Fig. 07) This is what it looks like...
(Fig. 08) If you now need to charge the battery, you can access the terminals easily and without fiddling...
(picture 09) when it is no longer needed, simply remove the threaded sleeve and put it to one side and seal the hole with a suitable cover.
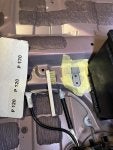
(Fig. 10) Once the hard foam insert has been removed, the chassis and battery are easily accessible. A first resistance measurement with the measuring tips held flat shows that the paint is insulated, no electrical continuity. Even with the tips, there is insulation. This is unsuitable for a high-current earth connection.
(Fig. 11) After first removing the negative terminal on the battery, drawing the outline of the earth connection on the chassis and marking it with masking tape...
(Fig. 12) it is time to remove the paint and primer cleanly using suitable means and then clean with methylated spirits or universal thinner.
(Fig. 13) Since I had it to hand, I applied a thin layer of silver conductive lacquer, but it also works without it.
(Fig. 14) After drying, check the resistance, 0.1 Ohm is the measuring cable itself, so everything is ok.
(Fig. 15) This was chosen as a further test point on the chassis, as the support plate initially had almost no continuity, 0.2 Ohm is ok.
(Fig. 16) Apply a very thin layer of battery grease.
(Fig. 17) Now everything is screwed together again.
(Fig. 18) The battery terminal protection spray is now in action, everything that could rust is treated with it and thus protected
(Fig. 19) Actually, the earth connections in the engine compartment should also be treated accordingly, but it is quite tight and not necessary, at least in my case.
(picture 20) because if you had to do it, this one would also be due (Toyota should also have something to do with a recall)
(picture 21) this is how it looked in the morning...
(picture 22) and like this after the test drive. I've never had this since I bought the car new!
After you have reassembled everything, you should have a constant charging voltage of approx. 14.4V when the battery is below 90% charge level until approx. 95% charge level is reached. So 12.5V to 12.7V is normal!
Of course, this solution can also be useful for other models and brands.
The high-resolution pictures and the log files of the driving measurements can be found here:
https://www.swisstransfer.com/…51-4779-af2d-f05b7ace698f
I hope you find this information useful.
Greetings from Ticino


translated by Deepl


